OUR ADVERTISERS

Wednesday, September 05, 2007

ENJOY THIS BIKE BUILD BLOG !


It's been over a year since I started this build and many things have happened since. For one the Galaxie is not part of my stable anymore. Some young deserving happy fellow bought it from me this spring and I feel it is in good hands. If this is your first visit to this site, you should scroll all the way down to start at the beginning. This way you will read the build in the proper order from beginning to end. I have refreshed the look of this blog since many people still visit it, the information is still very valid, and my blog making skills are a bit better since I first put this one together. So enjoy and don't forget to check out the comments, lots of good information in there as well. For more info, check out my main repair blog or you can do a search for bicycle related subjects in the "Bicycle" search engine in the sidebar. A custom built search engine by me with only sites that contain real bike info.

Good luck and get those fingers dirty!

Gerry

Thursday, November 02, 2006

SHOW OFF YOUR BIKE!


Hey there. I'm sure that many of you have been inspired to get going on some projects with this blog. You might even have some cool bike you want to show off. If that is the case, just email me some pics and some info on your ride and I will gladly post it. I'm no snob and I want to see everything, even unfinished projects. Don't be shy and send me your stuff at: xddorox@gmail.com

Sunday, October 01, 2006

CHEAP DISK BRAKES FOR THE BIKE, WELL NOT REALLY.


Last time we went for the V-Low club ride, we saw this guy with a regular 3 speed roadster that looked very clean and tricked out with many cool looking parts that I had never seen before. One of those cool things where hub cap/disk brake looking devices on his wheel hubs. I thought it gave the wheel an entirely different look and it worked real well.

I almost fell on the ground when he told me where he got them...the Dollar store! He bought some kiddy cymbals, removed the handles and then simply bolted them on. All that cool looking gear for a mere dollar. Of course I had to try it and today I went to our local dollar store and found the cymbals.

All I had to do was to remove the handles and install a washer between the cymbal and wheel bearings. The disk is not meant to turn with the wheel, but remain still.

Try it yourselves and remember, always go into the dollar store with an open mind!

My next article will be on upgrading the headlight of the bike with white LED's.

Ride safe.

Monday, September 11, 2006

TURNING THE PROJECT INTO A MUSCLEBIKE


Well, the lowrider look wasn't going to work. The seat had to be brought down even more and we made the mistake of taking it out for a ride! The ride is just sweet and I don't want to mess with it. I wanted to put a fat tire in the back and I happened to have a Maxxis Hookworm lying around the shop. It will have to do until I find something in the 3 inch wide range. We'll be posting a video soon of what we did before removing the old tire.

I also happened to have a huge NOS sissy bar that was given to me some years ago and I just couldn't resist slapping it on. This was inspired by some fans that we have in Copenhagen. I saw some of there rides and one of them was equipped in that fashion, thanks guys for the great idea.

This isn't over by a longshot. We have to either find a decent seat or refit this one. I want to equip the bike with a modern light system inside a vintage set-up. I've already done this on my cruiser using white LED's, so keep posted for that article. I also want to add some accessories without crowding the bike too much. It looks pretty good right now, apart from the crappy seat. Some careful additions will make it even better.

If you are lucky enough to be in Montreal, this bike will be at the corner of Rachel and St-Urbain on Sunday September 17 2006 at the V-Low bike ride, weather permitting. You'll be able to see the Galaxie in person and ask me all the questions you want.

Until then, ride safe and keep your hands dirty.

Gerry

Sunday, September 03, 2006

CLEAR COATED, TIME FOR FINAL ASSEMBLY


Well, I used an entire can of Krylon Epoxy clear coat on the frame. I had done my last wetsanding before hand. I shot the entire can in one day, leaving about 20 minutes between coats. I had to wait a week for everything to dry hard before even thinking about putting stuff back on...

...until yesterday! We took the whole day to put everything back together. I was lucky enough to have some parts lying around from previous projects. I had a pair of ape hanger handle bars, a mustang seat with sissy bar and a not bad looking bullet light. The seat has been covered in an amateur fashion, but it will do for now. The idea is to get rolling as fast as possible. The wheels came from a kiddy bike and as a bonus the tires have whitewalls. Just what we needed for that lowrider look we were aiming for. I also bought a nice chrome chain to go on it. I simply used the old chain to measure the proper length.

The hardest part was to clean and buff just about everything. The bottom bracket was the hardest with it's 30 year old caked on grease that just wouldn't quit! Even using the lemon furniture polish and steel wool, it wasn't a piece of cake. When all was ready to assemble, we just regreased everything with green axle grease and CAREFULLY put it back together. If there is one thing in this world that can just drive you nuts, is leaving a grand canyon scratch on that beautiful, hard earned, sweet paint job just as you put in the last screw! Not this time. We now get to scratch and ding that beautiful finish the way it's suppose to...while riding.

Reassembly is just the reverse of disassembly, so I won't go all over it again. We got this bike off the rack and took it on it's first ride...WOW! It rides very comfortably, the power reaches the pedals easily and the riding position is cool while still comfy. I think that the lowrider look is not going to fly. Hmmmmmm, this is more like a Muscle Bike and I just happen to have a Maxxis Hookworm lying around the workshop... Keep posted. Even though the build is over, the project is still ongoing.

In the meantime, we have put together a little video for all of you fans who have been with us for the past month. Enjoy and do keep posted for additions to the CCM Galaxie and it's adventures in this great city we call Montréal.

Gerry
If you get a blank box below or that the video is not working, go see it directly on the YouTube site with this link.

Thursday, August 24, 2006

PAINTING THE BICYCLE FRAME WITH COLOR


Day 1

After verifying that the primer was dry, I got on my trusty cruiser bicycle and headed for the closest Canadian Tire(This is one of the country's landmark stores) for the metallic red paint that I had in mind. I found a small can of auto touch up paint with the color "Rasperry Red" metallic. Cool, it looks almost like a perfect match to the Galaxie's original color. I got back home and prepared my set up, only to find that the can I had purchased was missing it's nozzle. Having no time to waste, I used the nozzle from my base color's can.

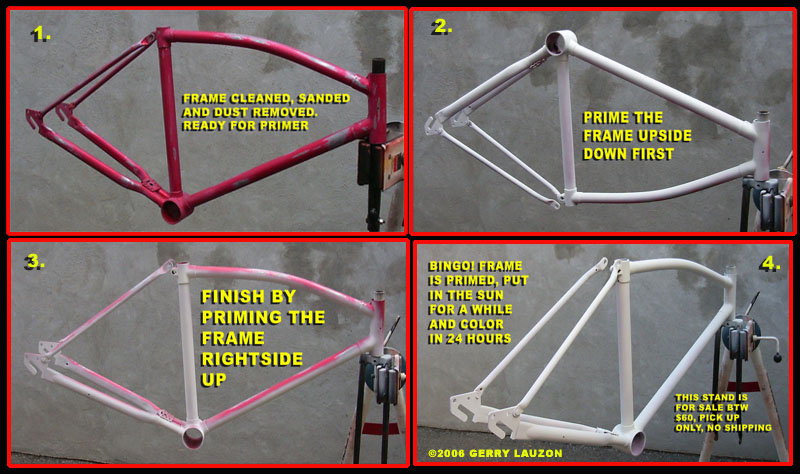
Before you start applying any coat of paint, you have to wet sand the primer to smooth out the small rough spots and eliminate overspray. Do this with a 400 grit or finer sandpaper that you immerse in water. You can even put water on the frame while you do this. Now in this case, sanding is a big word. You are applying paint from a rattle can, not a spray gun. The paint layer is pretty thin, so carress that frame with your very wet sand paper, don't rub or you'll go right through that coat in a flash. Feel with your hand between every pass, if it's smooth, stop, that's enough. Wet sanding will have to be done between every coat. Don't forget to clean and dry your frame after doing this. Just use water and a paper towel. Paint doesn't stick to water.

Metallic paints are somewhat translucent. You need to put down a base coat of the color you want to use before the metallic color, or not, it's up to you. I tested this on the fork that holds the bike in the stand. Since it got sprayed with primer at the same time as the frame yesterday, any booboo would come up right away. I also had the chance to look at the difference with and without the base coat on it. With, looked a lot better. So I sprayed the base coat first, which was GM Torch red. I did the same steps as in the primer how to. Paint underneath and the small nooks first. Then flip it over right side up and finish the job. Don't forget to wipe the nozzle every second pass with a rag to avoid paint build up on the nozzle and paint splatter on your surface. I masked the front of the bike frame since I wanted to keep it white. Spend the bucks on good tape and use lots of it. You don't want any other color than the one you have underneath that mask.

Since the base color and the metallic color were both the same type of paint and from the same manufacturer, I went ahead with the metallic coat that afternoon. The frame had been sitting in the blazing sun most of the morning and was dry to the touch. I again wet sanded the whole thing and did the upside down right side up painting routine again. The first coat of metallic took the whole can! It looked great...until it dried and I had a good view of it in the sun. Little mistakes here and there, spots missing paint. Crap! It needs a second coat, can't blame a guy for wishful thinking.

Day 2

Went back to the friendly neighbourghood Canadian Tire with the trusty cruiser. Bought another can of Rasperry Red, checked, before paying, that the stupid can came with a nozzle. Went home and started to set up, look at the sky...good, sunny. Wet sand the frame, clean it, apply second coat of metallic. Put the frame in the sun, apply first coat of epoxy clear to the already painted fork, wow! That stuff is amazing, like candy.

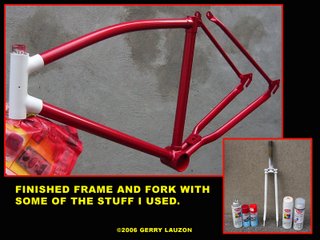
Bring the frame into the shed, started to rain. Rain stops, bring frame back out. Now I'm looking at this thing of beauty, it actually came out pretty good and all I want to do is slap on that super Krylon epoxy clear coat right now...AAAAAAAAArgh! I'll have to wait, even though the color is dry to the touch, I know too well that the process is not over underneath that rasperry shine. I apply another coat of clear to the fork to calm down. Remember, be patient, mistakes happen when we rush things. The clear coat will be applied tomorrow and the result will be awsome I am sure.

Next post, we'll start putting stuff back together. The clear coat will be left to dry for at least 4 days before I touch anything. When paint dries, you must threat it as if it was made of eggshells. New paint always seem to attract scratches when you rebuild. So wait for it to dry good before you handle it.

Til next time, keep your hands dirty.

Gerry

Tuesday, August 22, 2006

SANDING AND PRIMING THE FRAME AND FORK, AT LAST!


Ok, I decided to follow my own advice for once. I was about to start my first bicycle repaint job in many years and on top of it, I was going to try a new primer. So i decided to start with the fork, which I usually keep for last. My goal was to prime the fork, post about it and do the frame later.

WELL, I liked the end result so much that I primed the entire thing! That fork looked like a piece of candy after I had finished priming it. That white krylon primer works great. So naturally I was curious of how the frame would look, so I went ahead and primed it as well.

THE FORK

I started by cleaning the fork with paint thinner and then did a once over with 320 grit sandpaper to dull the paint. I then went after the dings and scratches to eliminate them all. After I was satisfied, I applied the primer.

Always start with the interior of the legs and the little nooks and crannies first. The exterior of the legs are the ones that are easier to paint because they are the obvious thing you see first and they are easier to reach. You don't want to start shooting primer to fill those little spots you missed after a perfect shot of primer on the most visible area. This is a perfect way to ruin it with overspray. I usually do small sanding touch ups after priming and then apply a second coat. But in this case I was satisfied with the end result. I put the fork in the sun and headed for the frame.

THE FRAME

Before I started, I had to remove the fender brace on the seat stays. I'm going to put in 20 inch wheels and fenders on a 24 inch wheel frame. There would be one ugly looking gap in between. I know that this will affect the rigidity of the frame, but I don't really care. I started by cutting most of the brace off. I though that I could break the welds off, I though wrong! So I went to the grinder for the biggest chunk, went to the Dremel tool for the medium part, went to the metal file for the small part and finished it off with putty and sandpaper. I did sweat a bit, because I was afraid I was going to go through the frame, but I didn't. The result looks great. I then used thinner and my nails to remove the last of the sticker glue on the seat tube(lighter fluid didn't work). I could now finally clean the entire frame with thinner and start sanding.

I had so much fun with the metal file, that I used it first to take out dings, scratches and some original defects out. I then finished the frame with 320 grit sandpaper by hand. I then used an old fork in my retired work stand(which is for sale for anyone in Montreal interested) and just dumped the headtube of the frame in it upside down. Yes, upside down. Always start with the bottom of the frame and all those little nooks and crannies. Same principle as in painting the fork.

Start with light passes until you build up a decent coverage. Keep a small rag to clean up the nozzle of your paint can every 2 passes. Paint builds up on the nozzle and you end up with paint spatters all over your paint job. Once you are satisfied with your handy work, turn the frame over and do the top. Once you are all done, wait not more then 20 minutes and do a second coat. Leave the frame in the sun for the primer to bake.

Paint takes time to dry. Even when it is dry to the touch, it's still not dry underneath the surface. You should wait 24 hours until you apply the color coat. Go over your frame and do little sanding touch ups if needed and apply another coat. This has to be done within 20 minutes. The primer won't be really dry and will still react to the thinner in the primer and will blend perfectly.

I don't have a garage, so I work outside. If you're stuck like me, you know that you need a nice warm sunny day. Keep in mind that dust, bugs and all kinds of foreign matter can end up on your perfect spray job while it is wet. Take note of the wind direction and vulnerable objects close by like the family car or your spouses favorite gnome! Paint travels with wind and were it lands...it stays.

LAST NOTE

Whatever you use to paint your bicycle, may it be a brush, spray can or a professional spray gun set-up, remember that the quality of your paintjob is totally dependant on your preparation work. Cleaning and sanding before you shoot one drop of paint or primer is as important as the paint job itself. Take your time.

Until then, keep your hands dirty.

Gerry

Sunday, August 20, 2006

Preparing the Galaxie frame and fork for primer

Today I started cleaning the frame of dirt, grease and left over glue from the old stickers. I had the chance to remove some myself with a hairdryer to warm up the glue before pulling them off. This melts the glue and it comes with the sticker. But the previous owner had pulled some off without that precaution, so now I have some glue to remove with lighter fluid. What a nasty job!

Stickers are great since they protect the original finish. The more original finish you have the better. This means less work for you. Mind you this is not my first CCM restoration and their finish is not that thick.

Always clean the frame and fork with solvent to remove grease and dirt BEFORE you sand, I use paint thinner myself. This will prevent all this crap to get itself in the metal and eventually into the primer and color. You will be standing there baffled at all the funky things happening to your paint job if you don't take this precaution. Trust me, been there.(Aaaaaaaargh maud%t T$b%rn&c!) If you sand an unclean frame, even the primer should come out funky.

I've finally decided on a colour scheme. I'm going with metallic red with a white front end. The front of the frame, the headtube and lugs, and the fork will be white. I've found some white primer from Krylon. This should be great, I've had good experiences with white primer in building models. The top color comes out more vibrant.

Here's a tip: If this is your first time repainting a bike, start with the fork. If you screw up the fork while learning this overhaul thing, it won't be a big deal to start over. Redoing an entire frame is another ball game. Learn on something small first and there's nothing quite as filthy as a fork. You'll know right away if your cleaning technic is good enough.

Next post, sanding. Til next time, keep your hands dirty!

Gerry

Thursday, August 17, 2006

PARTS GATHERED

Sorry for not posting in awhile, but things are crazy lately. However, I'm happy to report that I have gathered some parts for the Galaxie. I managed to get my hands on some nice chromed 20 inch wheels, ape hanger handlebars and a sissy bar.

I should start prepping the frame next monday with a new post on the subject that evening. So stay tuned and don't despair.

Gerry

Tuesday, August 08, 2006

REMOVING THE ONE PIECE CRANK FROM THE FRAME


Most coaster brake bikes are equiped with what is called a one piece crank bottom bracket. They can also be found on BMX bikes and the cheap variety chain store bikes. This set-up is pretty heavy compared to the three piece bottom bracket, but it has the advantage of being pretty tough with its washing machine type crown bearings. I've opened up bikes that the bearings had never seen the light of day for 30 years and still find them in working order. Also, I've never seen a one piece crank break or come off.

Our Lowrider project is equiped with such a bottom bracket and we are going to take it off. Pretty easy if you follow my step by step illustrations. One thing to remember is that some threads are reversed on a bike, like the left side pedal and the locknut and bearing cone on the left side of the bottom bracket. You have to unscrew those by going clockwise.

After you've taken everything apart, make sure you store it all in a place you can find it again and not lose anything throughout the cleaning process before reassembly. Our next article will be about how to clean out all these nice parts. Until then, ride safe.

Gerry

Saturday, August 05, 2006

REMOVING THE FORK FROM THE FRAME


REMOVING THE FORK FROM THE BICYCLE FRAME Here you have a step by step guide on how to remove the fork. You can't repaint a bike properly without doing that. At the same time you will be able to clean out all the parts and you can regrease the bearings. While you are cleaning them, if any ball bearing fall out of the bearing crown, it will need to be replaced. Just bring this with you at your local bike shop so you can get the proper size. You can also clean and polish the chrome parts and store them until reassembly. One way to remove rust from chrome is to use a fine steel wool with lemon furniture polish. The polish will lubricate the surface and keep the scratches to a minimum. A note on removing the bearing cups from the frame, don't wack them too hard and go around to distribute the energy. They will come out slowly. Bearing cups come out when they want to, you can't rush this.

Next article, we'll be removing and disassembling the one piece crank bottom bracket.

Friday, August 04, 2006

MAIN REPAIR BLOG

MAIN BIKE REPAIR BLOG You can always get to my main bicycle repair blog at howtofixbikes.blogspot.com

AT LAST WE BEGIN, WE HAVE OUR RIDE


AT LAST WE BEGIN: I found that is was fitting to start this first restoration project with a Canadian made bicycle. I was fortunate enough to have received a frame of an old CCM Galaxie that probably dates back to the early 70's. It is, or was, a roadster bike with 24 inch skinny tired wheels. The frame is in good shape with no damage or serious rust( Check out the pics).

CCM (Canadian Cycle and Motor) has been around for over a hundred years. I've owned several of those in many models over the years. Not the lightest and best bikes, but they always got you where you were going.

This doesn't look like much, but my project is to build an old school lowrider with 20 inch wheels and fenders. The bike will have coaster brakes, so no need for calipers to hook up to the frame. The lowrider fenders come with solid braces that don't really require them to be secured to the frame either. I think it will make a nice long strecthed ride, a different look for sure.