

Ok, I decided to follow my own advice for once. I was about to start my first bicycle repaint job in many years and on top of it, I was going to try a new primer. So i decided to start with the fork, which I usually keep for last. My goal was to prime the fork, post about it and do the frame later.
WELL, I liked the end result so much that I primed the entire thing! That fork looked like a piece of candy after I had finished priming it. That white krylon primer works great. So naturally I was curious of how the frame would look, so I went ahead and primed it as well.
THE FORK
I started by cleaning the fork with paint thinner and then did a once over with 320 grit sandpaper to dull the paint. I then went after the dings and scratches to eliminate them all. After I was satisfied, I applied the primer.
Always start with the interior of the legs and the little nooks and crannies first. The exterior of the legs are the ones that are easier to paint because they are the obvious thing you see first and they are easier to reach. You don't want to start shooting primer to fill those little spots you missed after a perfect shot of primer on the most visible area. This is a perfect way to ruin it with overspray. I usually do small sanding touch ups after priming and then apply a second coat. But in this case I was satisfied with the end result. I put the fork in the sun and headed for the frame.
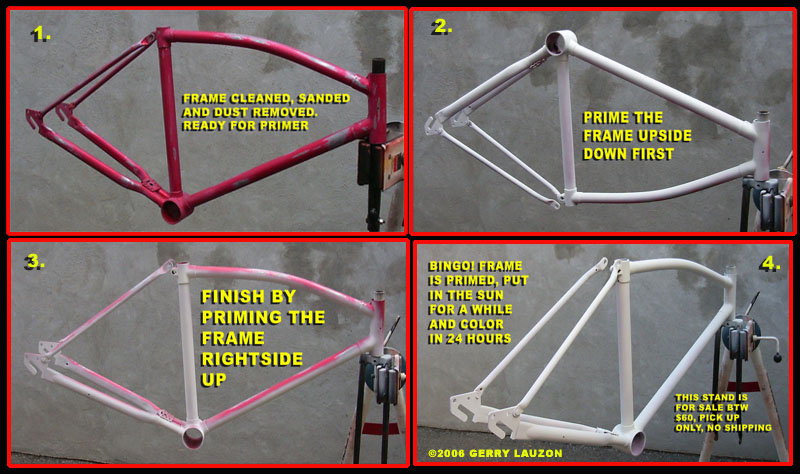
THE FRAME
Before I started, I had to remove the fender brace on the seat stays. I'm going to put in 20 inch wheels and fenders on a 24 inch wheel frame. There would be one ugly looking gap in between. I know that this will affect the rigidity of the frame, but I don't really care. I started by cutting most of the brace off. I though that I could break the welds off, I though wrong! So I went to the grinder for the biggest chunk, went to the Dremel tool for the medium part, went to the metal file for the small part and finished it off with putty and sandpaper. I did sweat a bit, because I was afraid I was going to go through the frame, but I didn't. The result looks great. I then used thinner and my nails to remove the last of the sticker glue on the seat tube(lighter fluid didn't work). I could now finally clean the entire frame with thinner and start sanding.
I had so much fun with the metal file, that I used it first to take out dings, scratches and some original defects out. I then finished the frame with 320 grit sandpaper by hand. I then used an old fork in my retired work stand(which is for sale for anyone in Montreal interested) and just dumped the headtube of the frame in it upside down. Yes, upside down. Always start with the bottom of the frame and all those little nooks and crannies. Same principle as in painting the fork.
Start with light passes until you build up a decent coverage. Keep a small rag to clean up the nozzle of your paint can every 2 passes. Paint builds up on the nozzle and you end up with paint spatters all over your paint job. Once you are satisfied with your handy work, turn the frame over and do the top. Once you are all done, wait not more then 20 minutes and do a second coat. Leave the frame in the sun for the primer to bake.
Paint takes time to dry. Even when it is dry to the touch, it's still not dry underneath the surface. You should wait 24 hours until you apply the color coat. Go over your frame and do little sanding touch ups if needed and apply another coat. This has to be done within 20 minutes. The primer won't be really dry and will still react to the thinner in the primer and will blend perfectly.
I don't have a garage, so I work outside. If you're stuck like me, you know that you need a nice warm sunny day. Keep in mind that dust, bugs and all kinds of foreign matter can end up on your perfect spray job while it is wet. Take note of the wind direction and vulnerable objects close by like the family car or your spouses favorite gnome! Paint travels with wind and were it lands...it stays.
LAST NOTE
Whatever you use to paint your bicycle, may it be a brush, spray can or a professional spray gun set-up, remember that the quality of your paintjob is totally dependant on your preparation work. Cleaning and sanding before you shoot one drop of paint or primer is as important as the paint job itself. Take your time.
Until then, keep your hands dirty.
Gerry


22 comments:
Great instructional series, Gerry! Fantastic photos, clear, unintimidating instructions, with a little humour thrown in for good measure.
Your painting instructions are just the ticket for my upcoming winter project to fix up an old VeloSport (ladies)bike (including paint job)that I picked up at yard sale for $8 bucks. Velo Sport, as I understand it, is also a Canuck brand, same company I think.
Really looking forward to following along as you progress through your 'Great Canadian' makeover.
Great stuff!
Bob Ashley
Thank you Bob, glad to see that people are enjoying this series. $8, that's a good deal. Velo Sport was made by Pro-Cycle wich makes (or made, I'm not sure anymore)CCM, Supercycle and Peugeot Canada as well. You won't have to wait too long for the next post. The weather was good today and I managed to put on a color coat. Keep posted and thanks again.
Gerry
C'est la première fois que j'entends parler de cette méthode. Ça semble trop intéressant pour que je ne l'essaie pas ! :)
Pour ce qui est de peindre à l'intérieur, j'aime bien me faire une structure simple de tubes de PVC dans la cuisine (!) avec des toiles de plastique sur les côtés mais aussi pour le plancher et le plafond. J'ajoute un tuyau de sécheuse collecté à la hotte de la cuisinière pour assurer l'expulsion des vapeurs de peinture. C'est pratique pour contrôler l'atmosphère de travail (élimination des poussières).
Continues ton bon travail,
Simon Forget
Merci Simon. Wow! C'est impressionant ta chambre à peinture temporaire dans la cuisine. Je crois pas que mon épouse serait trop favorable à cette idée. :)
Merci encore et bonne journée
Nice techniques... Sure beats my method.
hey great blog.
i'm rebuilding an old bike and i am in the process of painting the frame. a couple of quick questions:
must i sand the fram e completely (down to the metal) and what spray paints are good?
Hey Colin. Don't sand your frame down to the metal. The original finish of your bike offers the best protection. Leave as much of it as you can. I used Krylon paint for primer and red base coat. I then used automotive paint for the metallic finish and finished it off with a full big can of Krylon epoxy gloss clearcoat. If you don't want a metallic finish, just finish it off with the epoxy clear coat. Good luck and send me the results at xddorox@gmail.com I would love to post pictures of bikes that have been inspired by this blog.
Gerry
Gerry,
In one of your posts you mention that you did a rattle can flat black paint job on your cruiser. Did you do a clear coat over that? I just finished the last flat black coat on my bike painting project and am wondering if I should do a clear coat. I really like the way the flat black looks. Will a clear coat affect the finish?
Dave
Dave,
If you like the finish you have now, LEAVE IT! Flat black is great for touch ups later on, a clear coat would screw that up. You can shoot it with a flat clear coat, but it's not necessary. Send me a pic of your bike, I would love to see it. xddorox AT gmail.com
Gerry
Thanks for the advice Gerry. I'll send you a pic when I get the bike back together.
Dave
wow Gerry great detail but I was wondering what I would have to do to paint my Robinson SST its "Cro-Moly" so your assistance would be awesome
Spemcer, your frame is made of steel so these techniques should apply as well. The only difference would be in painting an aluminum bike frame where you would need a special zinc based primer. I wouldn't even know where to start for painting a carbon fiber frame. Cro-moly is just a different type of steel.
Gerry
thank you jerry you rock i will now be able to paint it up
peace and ride free
...spencer
Hi Gerry - Thanks for posting this tutorial, it's been very helpful for my found-in-the-trash bike project so far!
Anyway, my question is this: I'm re-painting an old 70s italian road bike that I'm turning into a fixed gear, and I'm up to sanding it at this point, after dealing with ancient stickers and chopping off the cable stays.
As many oldschool italian road bikes do, it has cool ornamental lugs. I'd like these to be shiny chrome/metal (they're painted white now) to match some nice chrome on the fork. Do you know if there is any way to do this on the cheap (polish the crap out of the steel and then clearcoat them perhaps?)
Any ideas would be appreciated. Thanks!
erin, polishing and clear coating would be your best option. It's a long process, but nothing beats a deep polish shine. However, see if those lugs are not already chromed under that paint, you could have a nice surprise. If not, get that polishing compound. Good luck, those lugged frames are real nice and worth the effort.
Gerry :)
Hey, Mr. Farrell here.
do you always use 320 grit? is it ok to use 180. the store was out of 220 at the time :/
also... could flat black be sprayed over clear coat to allow better protection and avoid a glossy finish?
Hello Mr Farrell, the grit of the sandpaper is always in relation with the condition of the surface you are working with. The rougher the surface, the rougher the grit. You can lay a coat of flat black on anything, just make sure you sand it first to make sure the paint can grab.
Gerry :)
Hi there, I have just bought an old ladies bike and would like to get it pretty again. I think I understand the instructions for the priming and painting, but how on earth do you get all the wheels and stuff off? The chain? The other thingy that the chain sits on? What about the handles? Can I just cover them over while I am painting? As you can probably tell I am not exactly a handyman but I am determined to have a go!
hey Gerry... are you using an etching primer??
im starting my first paint job on Penny's 78 stingray today. wish me luck :)
Hey Mr Farrell, I use Krylon's "rust tough" primer, it does a great job especially when you missed a few tiny rust spots. Good luck on the Stingray.
Gerry :)
thanx. i ended up getting the basic white primer they had at wallmart. i think i may have over done it but it looks ok.
btw... painting outside sucks. before i finished the first coat, i already particles all over it.
ps... you can call me farrell, for short. the mr. is just a formality for my screen name. :)
I know and feel your pain about painting outdoors! Don't hesitate to email me for questions and/or pictures of your progress at xddorox(at)gmail.com
Gerry :)
Post a Comment